Recording Barometric Pressure: How To Set It Up With Raspberry Pi and BMP180
By Ken Koon Wong in raspberry pi python barometric pressure atmospheric pressure arduino
April 3, 2025
Setting up the Raspberry Pi with a BMP180 sensor to track barometric pressure was easier than I expected, even with a bit of soldering required. This is a note for myself about the Python code that does all the heavy lifting while my little DIY weather station quietly logs atmospheric data every hour.

Motivation
I’ve always wondered if migraines are related to barometric pressure or the difference of it? There are studies that showed that there may be some association with it link. This study showed migraines fluctuate more dramatically and worsen with rising temperatures and pressure. What if we want to see if that’s the case for ourselves? It sounds like it’s a great opportunity to explore some barometric pressure sensor and see how we can log pressure for our own use! This blog is a note to myself of the process, and also codes to interact with the sensor.
Disclaimer:
Some of the images posted here are directly from the original website. Please feel free to right click on them and see where it points to.
Objectives:
- Get A Raspberry Pi
- Get A Barometric Sensor
- Write Python Code
- Set A Data logger
- Run It With Crontab
- Opportunities For Improvement
- Lessons Learnt
Get A Raspberry Pi
You can use other platform such as arduino or other similar products. I think raspberry pi has more functionality and is more flexible. The easiest is to get a Raspberry Pi startket kit by Canakit.

If the goal is just to log baroemtric pressure, you probably don’t need that high of a RAM or memory. And can probably save some 💰 with lower end specs.
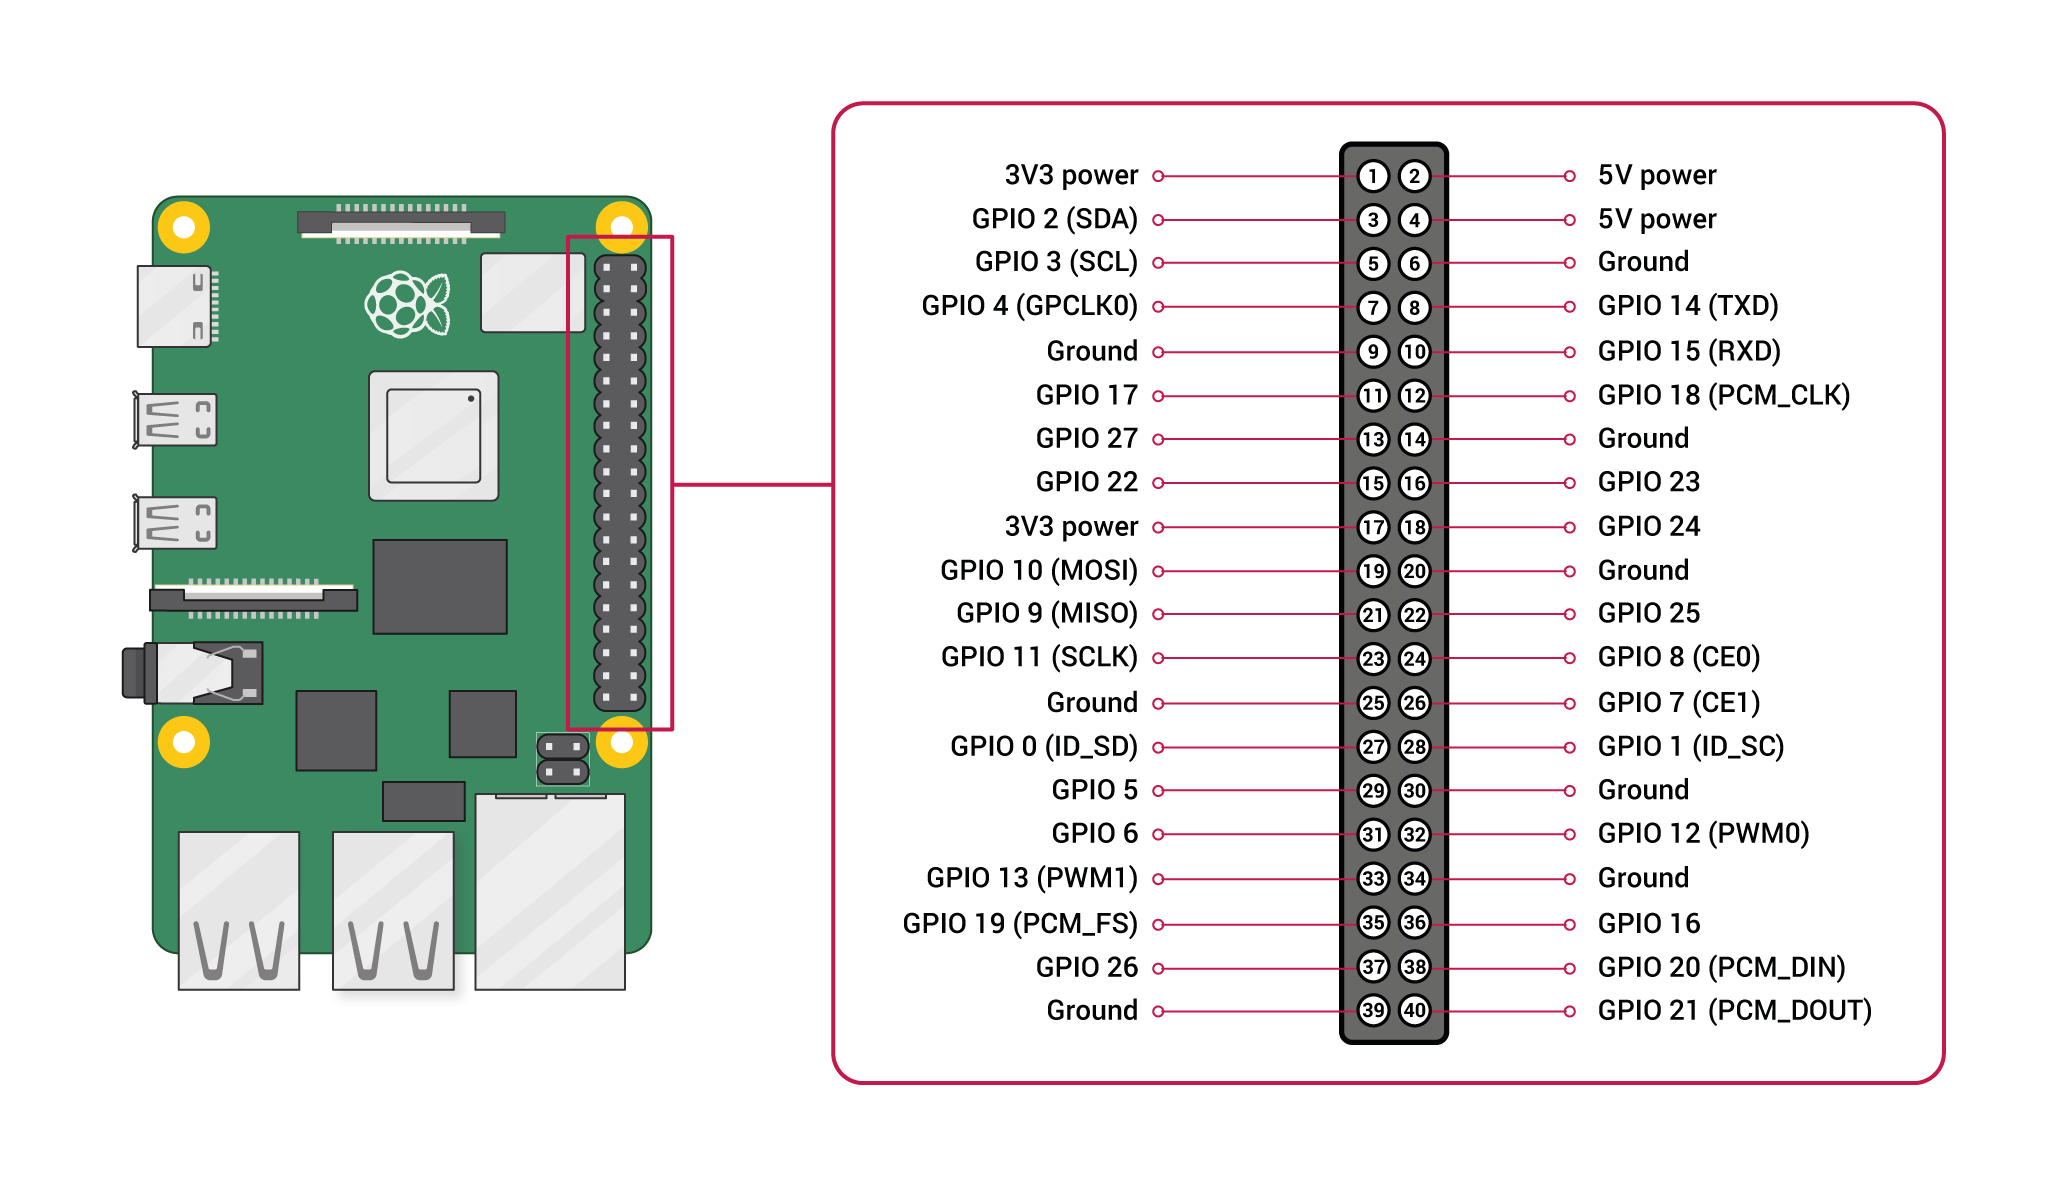
Raspberry Pi GPIO pin looks like this. We’ll be using 1, 2, 3, 4, 5, 6, 9
The very first time when you set up Raspberry Pi, you’d probably need to plug it into a monitor of some sort. Make sure to have a micro-HDMI to HDMI cable. Raspberry pi output uses micro-HDMI. If you bought the starter kit above, you don’t have to worry, it’s included in the kit.
Lately, I found having a portable small touch screen is helpful in setting up Raspberry Pi, before we enable SSH, remote etc. I found ROADOM Touch Screen Monitor with Case, 7’’ Raspberry Pi Screen, IPS FHD 1024×600,Responsive and Smooth Touch,Dual Built-in Speakers,HDMI Input to be very helpful recently. Because it’s touch-screen, that means I just need a small keyboard and I can use the screen for mouse.

To connect this touch screen to raspberry pi, you will have to:
- Connect micro-HDMI to HDMI (touch screen)
- Connect the USB-A (Rpi) to Touch Socket (touch screen)
- Connect the GPIO-pin to Rpi and touch screen (see picture), alternatively you can use power adapter provider instead (but this would mean 2 powers, 1 to Rpi and 1 to Touch screen)

After the setup above, make sure to enable Raspberry Pi Connect (should be on the top right of your screen) and also register for it to access your Rpi easily via the internet, either via remote screen or SSH. It’s great! For more on this, click
here
Get A Barometric Sensor
Now there is a variety of these sensors available online. Adafruit has a good selection of the latest ones with the latest python modules as well. I got mine a while ago and the repo might be a tad old and maybe even deprecated but it should still work. Of course, with the help of Claud e 3.7, it makes things even more convenient in converting certain codes to python.
This is what I have HiLetgo BMP180 GY-68 Digital Barometric Pressure Sensor Module Replace BMP085 for Arduino. Please feel free to explore, but make sure to use the right library when accessing it.
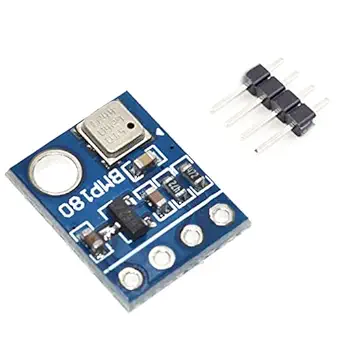
I think most of these sensors require some soldering. I had to for mine, but it’s not too hard, just need some practice for this. Make sure to connect the right pin to right Rpi GPIO pins. This should be pretty straight forward:
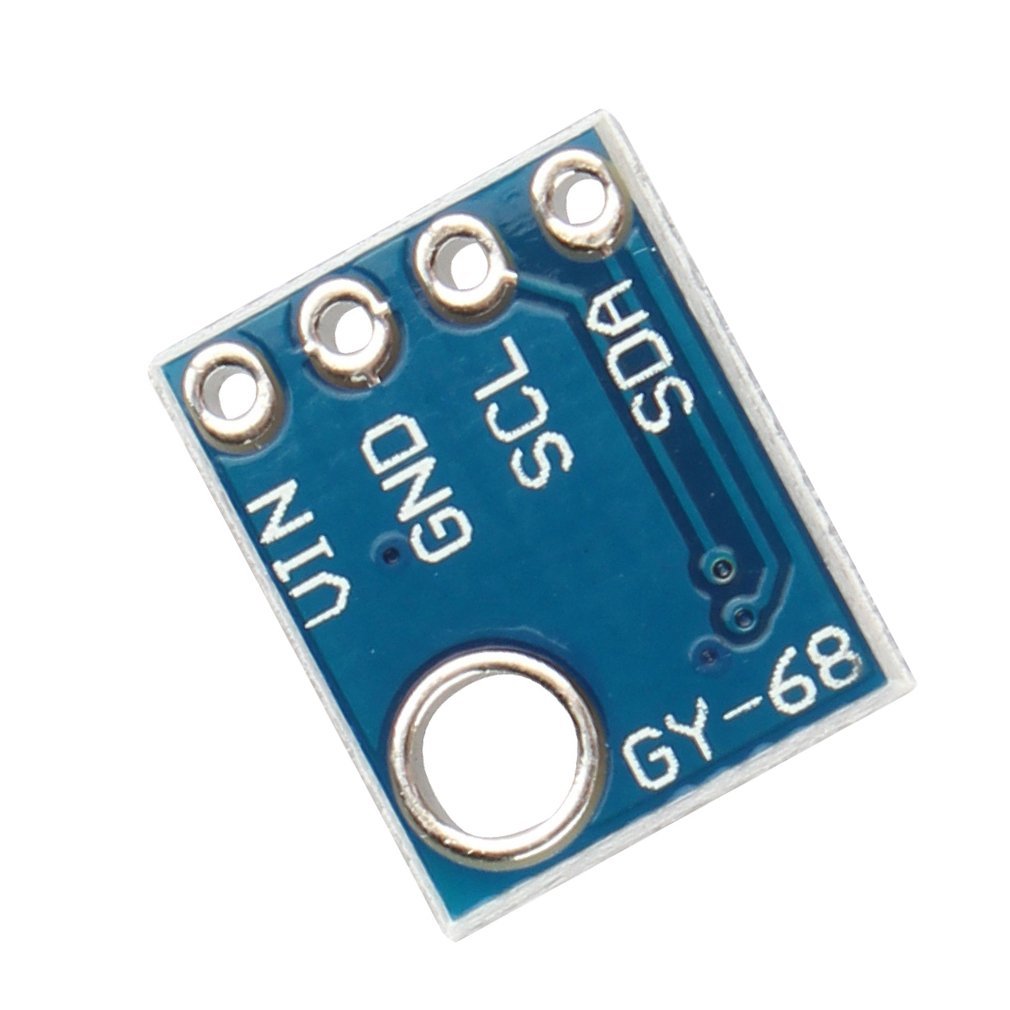
- Connect VIN to 3.3V (pin 1)
- Connect GND to GNB (pin 9)
- Connect SCL to SCL (pin 3)
- Connect SDA to SDA (pin 2)
Go deeper:
When you connect everything it should look like this, except yours might be more organized and neater 🤣:

On the left little sensor that is dangling, that’s the sensor. The white case is the Rpi. The screen is of course, the touch screen. A note, make sure you have female-to-female breadboard jumper wires for the sensor (you need 4), and also a soldering tool for the sensor.
Write Python Code
Now the code! Claude Sonnet 3.7 has been great at helping me to get this working. The Adafruit repo didn’t work for me, I’m sure it’s more of a user error. We could’ve dove deeper to figure out our problem and fix it, but instead we used a different route. Claude wrote me the code below (modified further to record the log via polars) without external repo but directly from the Bosch datasheet with all the calibration and algorithm! Wow, amazing! I can be confident in saying that I DON’T understand everything below, especially the algorithm/calibration portion. Maybe we’ll dive deeper in another blog, with the help of Claude of course 🤣
#!/usr/bin/env python3

import time
import math
from smbus2 import SMBus
import polars as pl
import datetime


# BMP180 registers
BMP180_ADDR = 0x77  # I2C address of BMP180
REG_CALIB = 0xAA    # Starting register for calibration data
REG_CONTROL = 0xF4  # Control register
REG_RESULT = 0xF6   # Result register
CMD_TEMP = 0x2E     # Command to measure temperature
CMD_PRES = 0x34     # Command to measure pressure
OVERSAMPLE = 0      # Pressure oversampling (0-3)

class BMP180:
    def __init__(self, bus_num=1, address=0x77):
        self.bus = SMBus(bus_num)
        self.address = address
        self.calibration = self._read_calibration_data()

    def _read_calibration_data(self):
        # Read calibration data
        cal_data = self.bus.read_i2c_block_data(self.address, REG_CALIB, 22)

        # Unpack calibration data
        cal = {}
        cal["AC1"] = self._get_signed_short(cal_data, 0)
        cal["AC2"] = self._get_signed_short(cal_data, 2)
        cal["AC3"] = self._get_signed_short(cal_data, 4)
        cal["AC4"] = self._get_unsigned_short(cal_data, 6)
        cal["AC5"] = self._get_unsigned_short(cal_data, 8)
        cal["AC6"] = self._get_unsigned_short(cal_data, 10)
        cal["B1"] = self._get_signed_short(cal_data, 12)
        cal["B2"] = self._get_signed_short(cal_data, 14)
        cal["MB"] = self._get_signed_short(cal_data, 16)
        cal["MC"] = self._get_signed_short(cal_data, 18)
        cal["MD"] = self._get_signed_short(cal_data, 20)

        return cal

    def _get_signed_short(self, data, index):
        val = data[index] * 256 + data[index + 1]
        if val > 32767:
            val -= 65536
        return val

    def _get_unsigned_short(self, data, index):
        return data[index] * 256 + data[index + 1]

    def read_raw_temp(self):
        # Write temperature measurement command
        self.bus.write_byte_data(self.address, REG_CONTROL, CMD_TEMP)
        time.sleep(0.005)  # Wait 5ms

        # Read raw temperature value
        data = self.bus.read_i2c_block_data(self.address, REG_RESULT, 2)
        return data[0] * 256 + data[1]

    def read_raw_pressure(self):
        # Write pressure measurement command
        self.bus.write_byte_data(self.address, REG_CONTROL, CMD_PRES + (OVERSAMPLE << 6))

        # Appropriate delay for oversampling setting
        if OVERSAMPLE == 0:
            time.sleep(0.005)
        elif OVERSAMPLE == 1:
            time.sleep(0.008)
        elif OVERSAMPLE == 2:
            time.sleep(0.014)
        else:
            time.sleep(0.026)

        # Read raw pressure value
        data = self.bus.read_i2c_block_data(self.address, REG_RESULT, 3)
        return ((data[0] * 256 + data[1]) * 256 + data[2]) >> (8 - OVERSAMPLE)

    def get_temperature(self):
        UT = self.read_raw_temp()
        X1 = ((UT - self.calibration["AC6"]) * self.calibration["AC5"]) >> 15
        X2 = (self.calibration["MC"] << 11) // (X1 + self.calibration["MD"])
        B5 = X1 + X2
        temp = ((B5 + 8) >> 4) / 10.0

        return temp, B5  # Return B5 for pressure calculation

    def get_pressure(self, B5):
        UP = self.read_raw_pressure()

        B6 = B5 - 4000
        X1 = (self.calibration["B2"] * ((B6 * B6) >> 12)) >> 11
        X2 = (self.calibration["AC2"] * B6) >> 11
        X3 = X1 + X2
        B3 = (((self.calibration["AC1"] * 4 + X3) << OVERSAMPLE) + 2) // 4

        X1 = (self.calibration["AC3"] * B6) >> 13
        X2 = (self.calibration["B1"] * ((B6 * B6) >> 12)) >> 16
        X3 = ((X1 + X2) + 2) >> 2
        B4 = (self.calibration["AC4"] * (X3 + 32768)) >> 15

        B7 = (UP - B3) * (50000 >> OVERSAMPLE)

        if B7 < 0x80000000:
            p = (B7 * 2) // B4
        else:
            p = (B7 // B4) * 2

        X1 = (p >> 8) * (p >> 8)
        X1 = (X1 * 3038) >> 16
        X2 = (-7357 * p) >> 16

        p = p + ((X1 + X2 + 3791) >> 4)

        return p / 100.0  # Convert Pa to hPa

    def get_altitude(self, pressure, sea_level_pressure=1013.25):
        return 44330.0 * (1.0 - pow(pressure / sea_level_pressure, 0.1903))

    def close(self):
        self.bus.close()

def read_file(file_path):
    try:
        data = pl.read_parquet(file_path)
    except:
        data = pl.DataFrame(schema={
            'timestamp': pl.Datetime,
            'temp': pl.Float64,
            'pressure': pl.Float64
        })
    return data

def timestamp():
    return datetime.datetime.now()


def main():
    old = read_file('pressure.parquet')

    try:
        sensor = BMP180()
        print("BMP180 sensor initialized successfully!")
        print("Press Ctrl+C to exit")
        print('-' * 40)

        temp_c, B5 = sensor.get_temperature()
        temp_f = temp_c * 9.0 / 5.0 + 32.0

        pressure = sensor.get_pressure(B5)
        altitude = sensor.get_altitude(pressure)

        print(f"Temperature: {temp_c:.2f} C ({temp_f:.2f} F)")
        print(f"Pressure: {pressure:.2f} hPa")
        print(f"Altitude: {altitude:.2f} m")
        print('-' * 40)

        new_data = pl.DataFrame({
            'timestamp':[timestamp()],
            'temp':[temp_f],
            'pressure':[pressure]
            })

        merge_data = pl.concat([old, new_data])
        merge_data.write_parquet('pressure.parquet')

        time.sleep(2)

    except Exception as e:
        print(f"Error: {e}")
    finally:
        if 'sensor' in locals():
            sensor.close()

if __name__ == "__main__":
    main()
Which when it’s run, it will look like this:

Run It With Crontab
## Open crontab
crontab -e

## Insert this on crontab
0 */1 * * * python3 pressure.py

## ctrl + o to save
## ctrl + x to exit
## then you will see
crontab: installing new crontab
0 */1 * * * *means, run this every hour everyday- if you use
venv, make sure you specify the venv python directory, instead of justpython3, for examplepath/to/your/venv/bin/python3 - lastly,
pressure.pyis your python script, change it to suit yours
Notice that I did not log the altitude. I mean that should be constant in the same place, right? 🤔
Et Viola! We did it! If we get them all right, it should be logging it at an hourly basis! It should look something like this.

See you in 6-12 months on the findings of this on another blog!
Opportunities For Improvement
- we could probably get a newer adafruit barometric sensor with more uptodate repo from circuitpython
- we’ll have to merge the migraine log to the pressure/temp dataframe, no biggie
- we can then use visualization to analyze the findings after ~6-12 months? Or explore n-of-1 trial methodology. I’m actually quite excited about this, can read more here
- need to dive deeper into those calibration/algorithm to get pressure/temp metrics.
Lessons Learnt
- touchscreen in this setting is so convenient in setting up Rpi. I will be using this method moving forward
- finally used rpi to interact with bmp180, in the past i had used arduino to test the sensor which was quite a simple approach
If you like this article:
- please feel free to send me a comment or visit my other blogs
- please feel free to follow me on BlueSky, twitter, GitHub or Mastodon
- if you would like collaborate please feel free to contact me
- Posted on:
- April 3, 2025
- Length:
- 9 minute read, 1785 words
- Categories:
- raspberry pi python barometric pressure atmospheric pressure arduino